Saturday, 1 December 2012

More sewing...

I've done more sewing than the baby sleeping bag, I've been getting ready for Christmas.... here is the christmas stocking I made for Aiden, bright red cotton with an appliqued christmas tree. I added a yellow felt diamond to the top of the tree (a star was too hard!), but can't decide if I should add more decorations to the tree or leave it as is.
Over the last 2 days I made Aiden a new outfit out of some of our old clothes... Mum gave me the sewing patterns she had from making our clothes so I used the old knitwit pattern & whipped up a t-shirt from one of my old ones, and a pair of shorts from an old pair of Gus'.
I love making little clothes, it's so quick. I think the shorts took me about an hour, including unpicking & resewing the inside leg seams as I mucked it up & sewed the wrong seams together!
His outfit is much less retro than the pattern! and I made the shorts about 2 inches longer too! much nicer to have long shorts than little stubbies :)  I used a cotton drill fabric for the shorts rather than a knit but they still worked out well.

And lastly, when mum gave me the patterns she also gave me some fabric, including an A line skirt she had cut out years ago but never made. I finished this off too, although it was a bit small so I added a panel down each side so it fit :)


Friday, 30 November 2012

Summer Baby Sleeping Bag

Last week I made Aiden a new sleeping bag for summer. I was sick of buying him new ones as he has grown out of 3 sleeping bags & almost a 4th already!
Luckily for me I had just got a voucher in the mail from Spotlight & the fabric was on sale. It's a nice dark navy blue cotton jersey.
I made a pattern based on his existing sleeping bag with an extra 10cm in length as that is where he is running out of room! I copied his existing sleeping bag & found some tips online, and came up with a double layer sleeping bag (so no need to bind the arm or neck holes as I sewed the rights sides together then turned it out), the zip has a guard at the neck & behind the zip to stop him eating the zip or the zip catching on his clothes, and I inserted the zip "upside down" so it opens from the bottom. Hopefully this, with a back up that I'll make next week, will see him through the summer!


Sunday, 30 September 2012

New baby pants from old shorts!

When I last went shopping for new clothes for Aiden (which is quite a frequent occurrence since he is growing so fast!), I was disappointed in the lack of long pants that weren't trackies or jeans. The weather is warming up so trackies are a bit too hot now. I found a few tutorials on line that had patterns for pants for babies, so I decided to make Aiden a couple of pairs from some old shorts of Gus'.

Before, 1 pair of mens shorts:

First I took apart the shorts by cutting the seams & unpicking the pockets on the back. I used a pattern from danamadeit.com, the shorts were just the right size for small pants:

I cut the shorts a bit smaller than the pattern as the pattern was for a size 2-3, but when I sewed it together they were too small! So I unpicked the outside leg seams & added a strip about 2" wide then resewed the legs back together, after seams there is just over an inch of extra fabric in the legs :) a good fix, looks OK & fits well :) maybe a bit too baggy in the legs, but a good fit over a cloth nappy bum!

After:

Plenty of room in the length for growing!

Tuesday, 25 September 2012

I've been a busy bee sewing up a storm...

Since I've been at home I haven't done any baking, BUT, I have done alot of sewing.

The 1st thing I made was some new cushion covers. These were made from a spare curtain so match the new curtains we put up in the house. I made an envelope back so no need for a zip, just a couple of velcro tabs to stop the cushion trying to escape out the back.
I had a go at quilting as well. I plan on making Aiden a quilt for once he is out of the cot (probably far too soon), so thought I better practice on something smaller! I made a table runner for christmas. I quilted in simple straight lines, the binding was the tricky part so what you see here is the 2nd attempt at binding! Much better than the 1st :)
The back was a nice christmassy print too.
Over the last week or so I have been enjoying having the sewing machine set up in the office, so whenever I feel like sewing, and Aiden is asleep, it's all ready to go.
Last week I finished recycling (?) an old set of flannelette sheets from our bed (king size) into single sized ones for Aiden, no pics, but they're a lovely dark blue, perfect for a little boy :)
I made a pretty sewing machine cover too. This used some cute fat quarters & some leftover material from the sheets.
Who knew my sewing machine would get such a workout! So here is it's nice new cover to keep it happy :)


Thursday, 22 March 2012

Breast Feeding Cover Up

When I was at Esra's baby shower last weekend, Carole gave her a clever breast feeding cover up that she had made. This inspired me to make one for myself in my free time I am enjoying before bubs arrives now that I have finished work....

a quick google search for a tutorial, a quick trip to spotlight (where I spent my $10 birthday voucher), less than $6 spent (so a huge $16 in total!) & I was ready to sew.

I found a couple of tutorials that were useful... this one & this one.

I wanted something nice & bright so I bought this bright green & white polka dot cotton.


There was enough fabric left over so I also made a wee carry bag for it too!


Now I just need bubs to arrive!

Thursday, 26 January 2012

Baby Shower Cake

A friend had her baby shower back in August......  here is the cake I created for her.

It was chocolate with vanilla buttercream piped in ruffles all around. A cute baby blue teddy bear on top completed the cake :)

Tuesday, 12 July 2011

Rich Chocolate Cake

It was Gus' birthday last week & he wanted a cake that tasted like & was pretty much just chocolate ganache! A google search found me a recipe by David Lebovitz that sounded promising so I decided to try it out the week before just in case! Here is that recipe, with how I made the cake.

Ingredients:
290g dark  chocolate (I used Nestle cooking chocolate)
200 g butter
5 large eggs (room temperature)
1 cup sugar

Instructions:
1. Preheat the oven to 175C.
2. Butter a springform pan then dust it with cocoa powder, tap out any excess. Wrap the outside with aluminum foil in case the pan isn't watertight.
3. Melt the LARGE amount of chocolate and butter, stirring occasionally, until smooth. Remove from heat.
4. In a large bowl, whisk together the eggs and sugar, then whisk in the melted chocolate mixture until smooth.
5. Pour the batter into the pan and cover the top of the pan with foil. 
6. Put the springform pan into a large roasting pan, and add enough hot water to the baking pan to come about halfway up to the outside of the cake pan.
7. Bake for 1 hour & a half (check after 1 hour and a quarter).
8. The cake is done when it feels just set, if you gently touch the center, your finger should come away clean.
9. Remove the pan from the water bath and remove the foil. 
10. Let the cake cool completely on a cooling rack.
It was divine! Gus loved it! It was very rich & strongly flavoured.
And the girls at my new job enjoyed it too! I took in the leftovers as there was no way I was leaving the leftovers at home to tempt me!

But.... then Gus decided he wanted something else.... so see the next post!!

Sunday, 26 June 2011

Jam Filled Vanilla Cupcakes

Friday was my last day working at Frucor. Traditionally in R&D the team does a big morning tea & farewell for people when they leave, but I decided to bake too.

I baked some vanilla mini cupcakes & filled them with raspberry jam for a tasty surprise.
  I baked my usual vanilla cupcakes, then once the cupcakes were cool I used a squeezy bottle with a small round tip filled with jam. To fill them I pushed the tip into each cupcake & squeezed some jam into each cupcake.
Then I iced each cupcake with the 1M Wilton tip with pale pink buttercream & added homemade purple fondant flowers.

Vanilla Cupcakes:

125g butter, softened
1 cup sugar
1 1/2 cups flour
1 t baking powder
125mL milk
3 eggs
1 t vanilla essence

Cream the butter & sugar, add the remaining ingredients & beat with an electric mixer at low speed for 1 minute. The batter should be smooth & light.
Half fill paper cases (my mini cases use about 1T batter) & bake at 180C for about 13-15 minutes.
Remove from oven & cool on a wire rack.


Makes about 40 mini cupcakes.


Buttercream Frosting (from the Wilton decorating course I completed earlier this year):

190g vegetable shortening (I use Kremelta or Sno Creme from Milly's Kitchen)
1/2 t clear vanilla flavour (Wilton)
1/2 t clear butter flavour (Wilton)
7-8 t milk or water (I use water)
450g icing sugar, sifted
1T Wilton Meringue powder

Cream the shortening (you may need to soften in the microwave 1st), flavours & water.
Add the dry ingredients & mix on medium with an electric mixer. Once all mixed it will be quite dry.
Mix on high speed for another minute until light & fluffy.
Add more liqud until desired consistency & mix well. Note: I use Wilton gel colours so they don't water down the iciing, if using liquid colours you will need less liquid in the icing to start with.

YUM!

Sunday, 12 June 2011

Boot Stuffers

A couple of weeks ago I bought some new black boots....
I was looking for some boot stuffers for them & also my other pair of brown boots. I hate how boots always end up flopping over & getting all creased so I wanted to keep my new boots nice & stop my old boots getting any worse.
I found this post by Craft Apple which inspired me... Happy Boots
I used an old pink dressing gown that didn't fit anymore & an old pair of Gus's jeans to create 2 pairs of boot stuffers.
Now they all stand up nice & straight & pretty. Love my boots!

2nd sewing project

After successfully making the aprons, my next sewing project was to make a tunic for me to wear.
Off I went to find a pattern & fabric at spotlight & I bought a simple pattern & some teal georgette.
1 weekend later & it was done. I had a few issues gathering the fabric for the neckline, but if you don't look too closely it looks pretty good! Here I am wearing it in March when Mum & I had a birthday dinner.

My first attempt at sewing....

Way back in February when Mum & Dad were on holiday I had Mum's sewing machine at home.... I decided while Mum wasn't around to just make whatever I needed, I'd have a go myself...

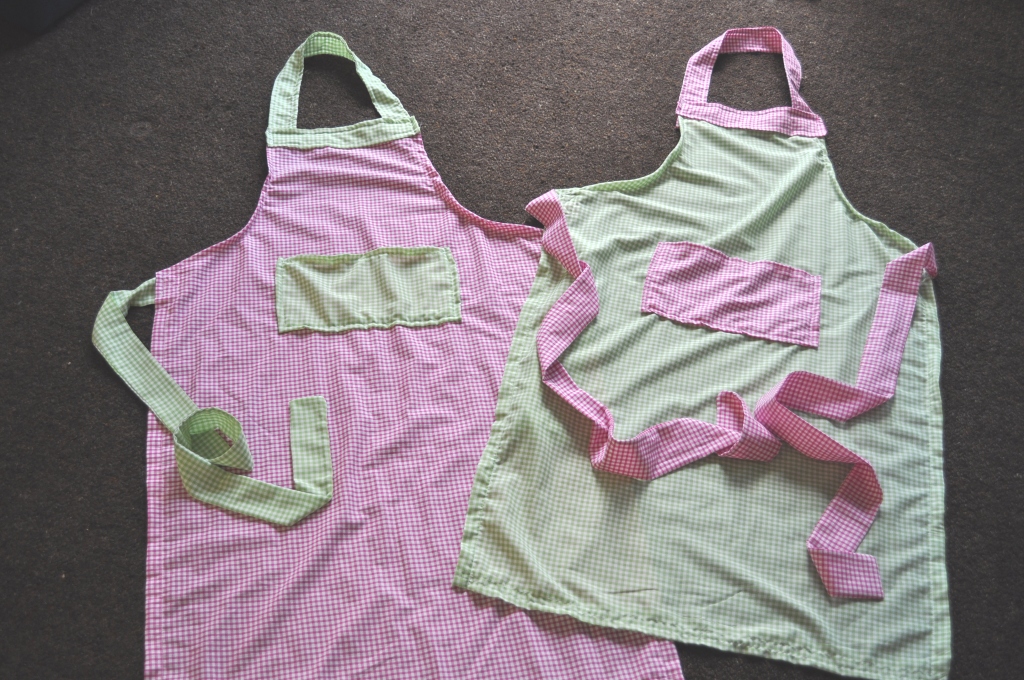
1st project: new aprons
I decided that making a couple of fun coloureful aprons would be a simple 1st project as I could use another apron as the pattern & just have a go. So I went to spotlight & bought some bright pink & green gingham & set about cutting out & sewing 2 full aprons.
It went pretty well & I'm happy with the finished result, especially since I hadn't sewn in about 18 years!

There was plenty of fabric left over so I made a couple of half aprons too, ready for gifts for other people. Olivia has already been the recipient of the pink half apron for her baby shower last month.

Saturday, 7 May 2011

Fairy Cupcakes

Little pink fairies in a garden..... Happy 4th Birthday Saph!

A few days ago in preparation I made some cute fairy cupcake picks using toothpicks & a fairy picture with a pink polka dot border. I simply printed the pictures & then cut out the circles & sellotaped a toothpick on the back. Easy :)

Last night it was time to decorate the mini vanilla cupcakes I had made last weekend & frozen.

First I added a small amount of green buttercream to the tops of the cupcakes with a spatula & spread it out, then using the Wilton grass tip (#233) piped grass upwards.
Then I piped small pink rosettes as flowers using Wilton tip #18 & added the cupcake picks I prepared earlier.
 I am really happy with how they came out, hopefully the kids at Saph's birthday party enjoy them!

Sunday, 3 April 2011

Final Wilton Decorating Basics Class

The final class in the Wilton Decorating Basics class was last monday.
I took along a cake all iced & ready to decorate, we learnt how to write on cakes & how to make the ribbon rose.
My cake was chocolate & I torted it into 3 layers, filled it with jam & chocolate buttercream & was iced with white buttercream.
The ribbon rose was pretty tricky, my buttercream wasn't quite stiff enough so I had a few issues. This definitely needs a bit more practice, but the ones I did make came out OK....
I had premade some drop flowers which I added on top of a drop border & added some little leaves...
The cake was enjoyed for a combined birthday dinner for Mum & I the next night.


Delicious!

Spiderman Cupcakes

It was Jayden's birthday party last weekend & I was asked to make some cupcakes. I decided on spiderman as that is 1 of his favourites. The party was on Saturday morning so I had a late night on Friday baking & then decorating.

First I baked vanilla cupcakes...


Then they were baked in the oven, once baked I left them to cool (& baked a 2nd batch)...


While the cupcakes were cooling, I started on the buttercream, I wanted bright red & black.
 For the red I started with white buttercream & used wilton no-taste red gel colour (& alot of it!).
For the black I started with chocolate buttercream & added wilton black gel colour & also some piping gel to help with the consistency for the design I wanted to do. I added extra vanilla flavour than usual as the large amount of colours used changed the flavour of the buttercream, the black became a little bitter.

I smoothed a think layer of red buttercream onto some of the cupcakes & piped using the 1M tip swirls on some of the cupcakes for the adults at the party! To the cupcakes with the thin smooth buttercream I used a parchment bag with a small hole & piped the spiderwebs, then added a plastic spiderman ring (this was 1 each for all the kids at the party). To some of them I piped letters to spell out Jayden's name & then arranged them all on a tray!


YUM!

Wednesday, 23 March 2011

Wilton cake decorating basics course, class 2

I am currently part way through the wilton cake decorating basics course at Milly's in Parnell, part of my latest birthday present (as well as a great new stand mixer!).
For class 2 we torted (cut layers), iced & piped a design on a cake. We learnt how to pipe 3d designs, how to transfer designs to the cake using piping gel & a few other things.


I made my favourite chocolate cake, filled it with raspberry jam & then iced with delicious buttercream all over & spent a while smoothing it all out! Then I transferred a design of a cupcake to the top of the cake & piped the design over the top!
The team at work enjoyed eating it the next day for my birthday afternoon tea!
nomnomnom :-)

1st post!

So, this is going to be somewhere to show what i'm doing with baking & cake decorating & sewing...