When I was at Esra's baby shower last weekend, Carole gave her a clever breast feeding cover up that she had made. This inspired me to make one for myself in my free time I am enjoying before bubs arrives now that I have finished work....
a quick google search for a tutorial, a quick trip to spotlight (where I spent my $10 birthday voucher), less than $6 spent (so a huge $16 in total!) & I was ready to sew.
I found a couple of tutorials that were useful... this one & this one.
I wanted something nice & bright so I bought this bright green & white polka dot cotton.
There was enough fabric left over so I also made a wee carry bag for it too!
Now I just need bubs to arrive!
Thursday, 22 March 2012
Thursday, 26 January 2012
Baby Shower Cake
A friend had her baby shower back in August...... here is the cake I created for her.
It was chocolate with vanilla buttercream piped in ruffles all around. A cute baby blue teddy bear on top completed the cake :)
Tuesday, 12 July 2011
Rich Chocolate Cake
It was Gus' birthday last week & he wanted a cake that tasted like & was pretty much just chocolate ganache! A google search found me a recipe by David Lebovitz that sounded promising so I decided to try it out the week before just in case! Here is that recipe, with how I made the cake.
Ingredients:
290g dark chocolate (I used Nestle cooking chocolate)
200 g butter
5 large eggs (room temperature)
1 cup sugar
200 g butter
5 large eggs (room temperature)
1 cup sugar
Instructions:
1. Preheat the oven to 175C.
2. Butter a springform pan then dust it with cocoa powder, tap out any excess. Wrap the outside with aluminum foil in case the pan isn't watertight.
3. Melt the LARGE amount of chocolate and butter, stirring occasionally, until smooth. Remove from heat.
4. In a large bowl, whisk together the eggs and sugar, then whisk in the melted chocolate mixture until smooth.
5. Pour the batter into the pan and cover the top of the pan with foil.
6. Put the springform pan into a large roasting pan, and add enough hot water to the baking pan to come about halfway up to the outside of the cake pan.
7. Bake for 1 hour & a half (check after 1 hour and a quarter).
8. The cake is done when it feels just set, if you gently touch the center, your finger should come away clean.
9. Remove the pan from the water bath and remove the foil.
10. Let the cake cool completely on a cooling rack.
It was divine! Gus loved it! It was very rich & strongly flavoured.
And the girls at my new job enjoyed it too! I took in the leftovers as there was no way I was leaving the leftovers at home to tempt me!
But.... then Gus decided he wanted something else.... so see the next post!!
Sunday, 26 June 2011
Jam Filled Vanilla Cupcakes
Friday was my last day working at Frucor. Traditionally in R&D the team does a big morning tea & farewell for people when they leave, but I decided to bake too.
I baked some vanilla mini cupcakes & filled them with raspberry jam for a tasty surprise.
I baked my usual vanilla cupcakes, then once the cupcakes were cool I used a squeezy bottle with a small round tip filled with jam. To fill them I pushed the tip into each cupcake & squeezed some jam into each cupcake.
Then I iced each cupcake with the 1M Wilton tip with pale pink buttercream & added homemade purple fondant flowers.
Vanilla Cupcakes:
125g butter, softened
1 cup sugar
1 1/2 cups flour
1 t baking powder
125mL milk
3 eggs
1 t vanilla essence
Cream the butter & sugar, add the remaining ingredients & beat with an electric mixer at low speed for 1 minute. The batter should be smooth & light.
Half fill paper cases (my mini cases use about 1T batter) & bake at 180C for about 13-15 minutes.
Remove from oven & cool on a wire rack.
Makes about 40 mini cupcakes.
190g vegetable shortening (I use Kremelta or Sno Creme from Milly's Kitchen)
1/2 t clear vanilla flavour (Wilton)
1/2 t clear butter flavour (Wilton)
7-8 t milk or water (I use water)
450g icing sugar, sifted
1T Wilton Meringue powder
Cream the shortening (you may need to soften in the microwave 1st), flavours & water.
Add the dry ingredients & mix on medium with an electric mixer. Once all mixed it will be quite dry.
Mix on high speed for another minute until light & fluffy.
Add more liqud until desired consistency & mix well. Note: I use Wilton gel colours so they don't water down the iciing, if using liquid colours you will need less liquid in the icing to start with.
YUM!

I baked some vanilla mini cupcakes & filled them with raspberry jam for a tasty surprise.
I baked my usual vanilla cupcakes, then once the cupcakes were cool I used a squeezy bottle with a small round tip filled with jam. To fill them I pushed the tip into each cupcake & squeezed some jam into each cupcake.
Then I iced each cupcake with the 1M Wilton tip with pale pink buttercream & added homemade purple fondant flowers.
Vanilla Cupcakes:
125g butter, softened
1 cup sugar
1 1/2 cups flour
1 t baking powder
125mL milk
3 eggs
1 t vanilla essence
Cream the butter & sugar, add the remaining ingredients & beat with an electric mixer at low speed for 1 minute. The batter should be smooth & light.
Half fill paper cases (my mini cases use about 1T batter) & bake at 180C for about 13-15 minutes.
Remove from oven & cool on a wire rack.
Makes about 40 mini cupcakes.
Buttercream Frosting (from the Wilton decorating course I completed earlier this year):
190g vegetable shortening (I use Kremelta or Sno Creme from Milly's Kitchen)
1/2 t clear vanilla flavour (Wilton)
1/2 t clear butter flavour (Wilton)
7-8 t milk or water (I use water)
450g icing sugar, sifted
1T Wilton Meringue powder
Cream the shortening (you may need to soften in the microwave 1st), flavours & water.
Add the dry ingredients & mix on medium with an electric mixer. Once all mixed it will be quite dry.
Mix on high speed for another minute until light & fluffy.
Add more liqud until desired consistency & mix well. Note: I use Wilton gel colours so they don't water down the iciing, if using liquid colours you will need less liquid in the icing to start with.
YUM!
Sunday, 12 June 2011
Boot Stuffers
A couple of weeks ago I bought some new black boots....
I was looking for some boot stuffers for them & also my other pair of brown boots. I hate how boots always end up flopping over & getting all creased so I wanted to keep my new boots nice & stop my old boots getting any worse.
I found this post by Craft Apple which inspired me... Happy Boots
I used an old pink dressing gown that didn't fit anymore & an old pair of Gus's jeans to create 2 pairs of boot stuffers.
Now they all stand up nice & straight & pretty. Love my boots!
I was looking for some boot stuffers for them & also my other pair of brown boots. I hate how boots always end up flopping over & getting all creased so I wanted to keep my new boots nice & stop my old boots getting any worse.
I found this post by Craft Apple which inspired me... Happy Boots
I used an old pink dressing gown that didn't fit anymore & an old pair of Gus's jeans to create 2 pairs of boot stuffers.
Now they all stand up nice & straight & pretty. Love my boots!
2nd sewing project
After successfully making the aprons, my next sewing project was to make a tunic for me to wear.
Off I went to find a pattern & fabric at spotlight & I bought a simple pattern & some teal georgette.
1 weekend later & it was done. I had a few issues gathering the fabric for the neckline, but if you don't look too closely it looks pretty good! Here I am wearing it in March when Mum & I had a birthday dinner.
Off I went to find a pattern & fabric at spotlight & I bought a simple pattern & some teal georgette.
1 weekend later & it was done. I had a few issues gathering the fabric for the neckline, but if you don't look too closely it looks pretty good! Here I am wearing it in March when Mum & I had a birthday dinner.
My first attempt at sewing....
Way back in February when Mum & Dad were on holiday I had Mum's sewing machine at home.... I decided while Mum wasn't around to just make whatever I needed, I'd have a go myself...
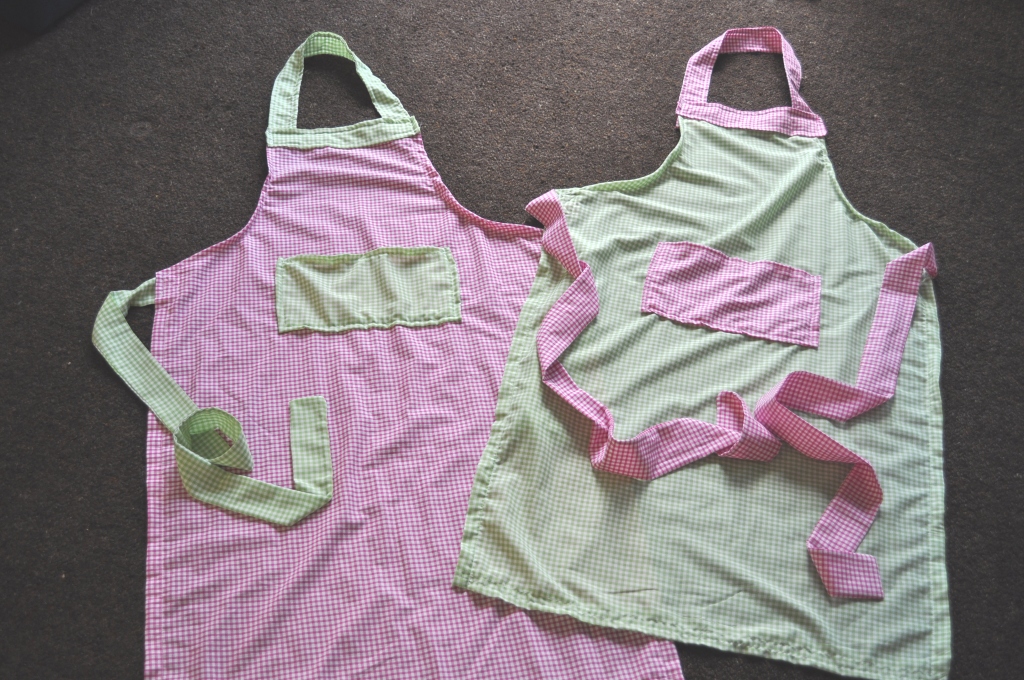
1st project: new aprons
I decided that making a couple of fun coloureful aprons would be a simple 1st project as I could use another apron as the pattern & just have a go. So I went to spotlight & bought some bright pink & green gingham & set about cutting out & sewing 2 full aprons.
It went pretty well & I'm happy with the finished result, especially since I hadn't sewn in about 18 years!
There was plenty of fabric left over so I made a couple of half aprons too, ready for gifts for other people. Olivia has already been the recipient of the pink half apron for her baby shower last month.
1st project: new aprons
I decided that making a couple of fun coloureful aprons would be a simple 1st project as I could use another apron as the pattern & just have a go. So I went to spotlight & bought some bright pink & green gingham & set about cutting out & sewing 2 full aprons.
It went pretty well & I'm happy with the finished result, especially since I hadn't sewn in about 18 years!
There was plenty of fabric left over so I made a couple of half aprons too, ready for gifts for other people. Olivia has already been the recipient of the pink half apron for her baby shower last month.
Subscribe to:
Posts (Atom)